Configuring the Guest WiFi Network
Once a policy has been defined and a WAN IP registered, the Guest Wi-Fi network can be configured to use DNS Protection.
There are two steps to complete the configuration:
Testing DNS Resolution
It is important to test before forwarding DNS requests to the DNS Protection servers. This verifies that the WAN IP address entered is correct, while also confirming the service is performing as expected.
To test DNS resolution:
- Open a command prompt.
- Run NSLookup.
- Set the server to 45.54.55.54.
- Check several sites to confirm valid responses.
A successful test looks like the following:
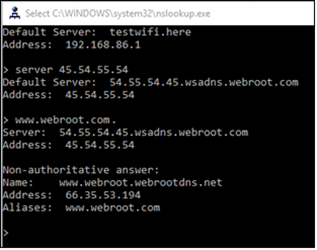
If the NSLookup times out, check that you have registered the correct WAN IP address. For more information regarding WAN IP Addresses, see the DNS Protection Admin Guide.
Configuring DNS
Once DNS has been successfully tested, all DNS requests for the Guest Wi-Fi network can be forwarded to the DNS Protection servers. The DNS Protection Servers for Wi-Fi are:
- 45.54.55.54
- 45.54.55.55
The DNS settings for the Router or Access Point should look as follows:
- DNS1: 45.54.55.54
- DNS2: 45.54.55.55
- DNS3: Failover DNS Server (Provided by ISP)
In the case of a DNS server, the DNS Protection Servers should be configured as Forwarders. Alternately, DHCP can be used to pass the DNS settings directly to each connected device.
Note that the only time the third DNS server should answer is if both the Primary and Secondary fail to do so. This setting is optional.
To test DNS Protection is working correctly, simply connect a device to the Guest Wi-Fi network. The internet should function as per normal. If, however, a prohibited site is requested, the Webroot Block page should appear. Note that communication on this Block Page can be customized under Global Settings, Web Overrides, and Block Page Settings.

