Manually mapping drives in a recovery
After creating recovery media, you can recover a Windows server from a backup to a destination server. The destination server can be a physical or virtual machine where the system was backed up or a different machine. For more information, see BMR Agent 26.2.1 supported platforms, requirements, and known issues.
Using recovery media, you can only restore volumes to basic disks. However, you can convert basic disks to dynamic disks after starting a recovered system. For more information, see Recovering dynamic disks and spanned volumes.
When device installation restrictions in a system's group policy could prevent a recovered system from starting successfully, the BMR Agent tries to change the device installation restrictions. You can change the device installation restrictions back after starting the recovered system. For more information, see Recovering servers with device installation restrictions.
Note: If you are restoring a system to a different destination machine (i.e., not the machine where it was backed up), make sure that the original machine is offline. This will help avoid IP address and name conflicts after the restore.
To map drives manually during a recovery:
-
Start the recovery as described in Recovering a Windows server. Complete steps in the BMR Agent wizard until you see the Plan the recovery page. This page shows disks and volumes in the source (backed up) server and in the recovery (destination) server. Blue rectangles in the Source Server section represent volumes that were backed up and can be restored. For more information about items on the page, see Source and recovery server icons.
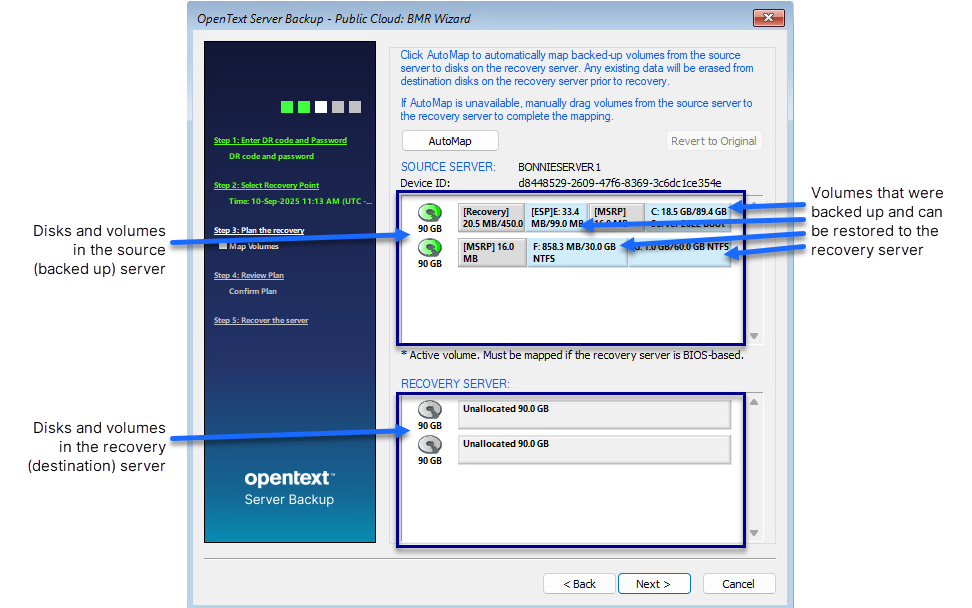
Using this page, you can create a recovery plan. A recovery plan shows which volumes from the source server to restore to the recovery server. Blue rectangles in the Recovery Server section represent volumes that will be restored.
Note: If disks are missing from the recovery server, you might need to add drivers for a RAID controller or other disk device.
-
(Optional) To make room for volumes that you want to recover by deleting a volume from the recovery server, right-click the volume in the Recovery Server area, and click Delete Volume.
Note: You can delete an MSRP volume using this method if it is the last partition remaining on a disk. To delete an MSRP volume that is not the last partition remaining on a disk, right-click the disk icon and change the disk format.
-
(Optional) To view a volume label in a tooltip, point to the volume.
-
Do one or more of the following until the Recovery Server area shows the volumes that you want to restore to the recovery server:
-
To convert a disk in the recovery server to GPT or MBR, right-click the disk icon and choose Convert to GPT disk or Convert to MBR disk.
-
If the source server has an "ESP" volume:
-
Drag the ESP volume from the source server to the start of a GPT-formatted disk in the recovery server.
If a message states that an EFI partition can only be restored to a UEFI system, you are trying to restore the system to a BIOS machine. You can only restore a UEFI-based system to a UEFI destination machine.
-
Drag the "Boot" volume from the source server to the right of the ESP volume in the recovery server.
-
Drag other volumes that you want to restore, if any, from the source system to the recovery server.
A system with an ESP volume is UEFI-based. For more information, see Recovering UEFI-based systems.
-
-
If the source server has a "System" volume:
-
Drag the "Boot" volume from the source server to the start of a GPT-formatted disk in the recovery server.
If an ESP volume is created automatically in the recovery server, you do not need to restore the System volume.
-
If an ESP volume is not created automatically, drag the System volume to the right of the Boot volume.
If a message states that the volume is an OEM volume, delete the Boot volume from the recovery server disk. Drag the System volume to the start of the recovery server disk, and then drag the Boot volume to the right of the System volume. For more information, see Recovering systems with OEM partitions.
-
Drag other volumes that you want to restore, if any, from the source server to the recovery server.
A system with a "System" volume is BIOS-based. For more information, see Recovering BIOS-based systems.
-
-
To remove volumes from the Recovery Server area and start mapping volumes again, click Revert to Original.
-
-
Click Next.
The Review Plan page lists changes that will be made in the recovery server if you run the recovery.
-
Review the recovery plan. Do one of the following:
-
To recover the source server as shown in the recovery plan, select Click here to confirm the recovery plan, and then click Next. The recovery begins. The BMR wizard shows the recovery progress.
Note: Incorrect drive letters might not be temporarily assigned until you start the recovered server. For example, the C: drive might be assigned to the F: drive. When you restart the recovered server, the correct drive letters will be assigned.
-
To change the recovery plan, click Back, and then repeat Steps 8 and 9.
-
-
When a message box states that the restore was completed successfully, click OK.
-
On the Recovery progress page, click Next.
-
On the Congratulations page, click Next.
A repair process begins and the Repair Wizard page appears. See Repairing a recovered server.
-
To start the recovered server, select Reboot the system. Click Finish.
Note: A recovery must finish within 72 hours or it will fail. This time limit is from the Windows Preinstallation Environment (Windows PE), which is used during the recovery.
Note: After you recover a system with more than one disk, you might need to bring the disks online using the Disk Management utility or diskpart command interpreter in Windows.