Recovering a Windows server
You can use recovery media to recover each Windows server. Recovery media is a USB flash drive or other bootable device with a BMR Agent ISO image file, and is used to boot destination machines and recover Windows servers.
If you are recovering a server to hardware or to a virtual machine, you must create recovery media as described in Recovering a Windows server to hardware or to a virtual machine. You can use the recovery media to boot the destination server and recover the machine. For destination server requirements, see Choosing a recovery server.
If you are recovering one or more Windows servers to the AWS cloud, recovery media is pre-installed on each EC2 instance created during the process described in Recovering Windows servers to the AWS cloud. After recovering a server to an EC2 instance, remote desktop will be enabled on the server and the firewall will allow remote desktop connections to the server.
Using recovery media, you can only restore volumes to basic disks. However, you can convert basic disks to dynamic disks after starting a recovered system. For more information, see Recovering dynamic disks and spanned volumes.
When device installation restrictions in a system's group policy could prevent a recovered system from starting successfully, the BMR Agent tries to change the device installation restrictions. You can change the device installation restrictions back after starting the recovered system. For more information, see Recovering servers with device installation restrictions.
Note: If you are recovering a server (not testing the disaster recovery process), make sure that the original server is offline. Otherwise, backups might not continue after the recovery.
To recover a Windows server:
-
Choose a recovery (destination) server where the source (backed up) server will be restored. For recovery server requirements, see Choosing a recovery server.
-
Boot the recovery server from the recovery media.
If the BMR Agent is on a bootable USB flash drive, CD or DVD, the device should be the first option in the boot order of the firmware. If another bootable device is listed before the recovery media, the BMR Agent might not launch automatically.
If the BMR Agent ISO file is on a PXE server, the PXE option must be enabled in the firmware and the DHCP server must be set up in the network where the system resides.
-
On the Server Backup page, specify the time zone and keyboard, and then click Next.
This time zone is used for showing available recovery points (i.e., backup start times) during the recovery. The recovered server will have the time zone of the system that was backed up.
-
On the Server Backup - Public Cloud: BMR Agent page, click the Recover my system button.
The BMR Agent wizard lists steps in the recovery process.
-
Read the steps, and then click Next.
-
On the Enter DR code and Password page, do the following:
-
In the Disaster Recovery Code box, enter the disaster recovery (DR) code. If you are recovering a Windows server to hardware or to a virtual machine, the code was provided in the Management Console. If you are recovering a server to the AWS cloud, the code appears in the Disaster Recovery User Guide (DRRunbook.html), which is part of the Disaster Recovery package downloaded from the Management Console.
IMPORTANT: Enter the disaster recovery (DR) code exactly as it appeared in the Management Console or Disaster Recovery User Guide. The code is case-sensitive and must include all characters, including dashes.
-
In the Agent Password box, enter the password used to encrypt the agent's data.
-
Click Next.
-
-
On the Select Recovery Point page, click the recovery point from which you want to restore, and then click Next.
Each recovery point is the start date and time of a backup, shown in the time zone selected in Step 3.
The Plan the recovery page appears. This page shows disks and volumes in the source (backed up) server and in the recovery (destination) server. Blue rectangles in the Source Server section represent volumes that were backed up and can be recovered. For more information about items on the page, see Source and recovery server icons.
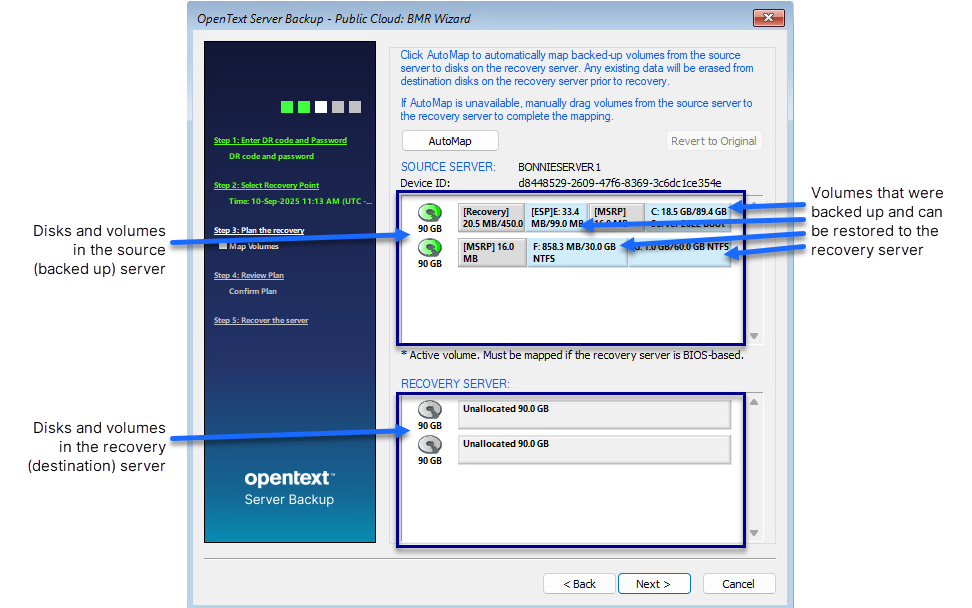
Using this page, you can create a recovery plan. A recovery plan shows which volumes from the source server to restore to disks on the recovery server. Blue rectangles in the Recovery Server section represent volumes that will be restored.
Note: If disks are missing from the recovery server, you might need to add drivers for a RAID controller or other disk device.
-
Do one of the following:
-
To automatically create a recovery plan, click AutoMap.
Note: The AutoMap button does not appear unless the source server and recovery server meet the requirements described in Automatically mapping drives in a recovery. If the button does not appear, you must map volumes manually.
-
To map volumes manually from the source server to disks in the recovery server, drag volumes from the Source Server area to the Recovery Server area. For more information, see Manually mapping drives in a recovery.
(Optional) To remove volumes from the Recovery Server area and start mapping volumes again, click Revert to Original.
-
-
Click Next.
The Review Plan page lists changes that will be made in the destination server if you run the recovery.
-
Review the recovery plan. Do one of the following:
-
To recover the source server as shown in the recovery plan, select Click here to confirm the recovery plan, and then click Next. The recovery begins. The BMR wizard shows the recovery progress.
Note: Incorrect drive letters might be temporarily assigned until you restart the recovered server. For example, the C: drive might be assigned to the F: drive. When you restart the recovered server, the correct drive letters will be assigned.
-
To change the recovery plan, click Back, and then repeat Steps 8 and 9.
-
-
When a message box states that the restore was completed successfully, click OK.
-
On the Recovery progress page, click Next.
-
On the Congratulations page, click Next.
A repair process begins and the Repair Wizard page appears. See Repairing a recovered server.
-
To start the recovered server, select Reboot the system. Click Finish.
Note: A recovery must finish within 72 hours or it will fail. This time limit is from the Windows Preinstallation Environment (Windows PE), which is used during the recovery.
Note: After you recover a system with more than one disk, you might need to bring the disks online using the Disk Management utility or diskpart command interpreter in Windows.